Official Luthiers Forum!
http://www-.luthiersforum.com/forum/

Applying clear pickguards?
http://www-.luthiersforum.com/forum/viewtopic.php?f=10102&t=2127
Page 1 of 1

Author:  Tim McKnight [ Wed Jun 08, 2005 5:49 am ]
Post subject: 

Anyone have tips for applying clear pickguards? I seem to remember spraying Windex or something on first then squeegiing the air and water out??? I put one on (dry)and it has some air bubbles in it and looks crappy.

Author:  John How [ Wed Jun 08, 2005 5:59 am ]
Post subject: 

My only suggestion is to work the bubbles out as you go across the guard, pealing the backing off a little at a time. But maybe that easier said than done. I did one on a flat top mandolin many years ago and did not like the way it aged so I haven't used one since.John How38511.6253935185

Author:  Josh H [ Wed Jun 08, 2005 6:03 am ]
Post subject: 

Tim

I put them on dry and have managed to get pretty good at it. I start by figuring out exactly where I want it to go. I then will put a small piece of masking tap on the top which will act as a guide. All I have to do is line the straight edge of the guard up with my tape and I know it will go where I want it to. I then peal the backing off along the edge where it will line up with the tape. Don’t remove the whole backing, just along the straight edge to get it started. As you begin to smooth out the guard the rest of the backing will come off. I take a piece curved cork and begin to smooth the guard onto the top. I start at the one edge and work my way towards the center. I go slow and am always going back over the parts that I have just stuck down. Take a close look when it is on to see if there is any dust under the guard or if you have bubbles.

As far as getting the guard off.. Use a hair dryer to heat it and it will come off just fine. Clean up with Naptha. I had to do this on a few of my first ones.

Well that is probably as clear as mud. I think Frank Ford had something on his site, but it seems to be down right now. I have heard of people putting a drop of water under the guard when they put it down and then working out the bubbles but I have never tried it. Ones you get the hang of doing it dry it really isn’t that hard.

Josh

Author:  Jimmy Caldwell [ Wed Jun 08, 2005 6:07 am ]
Post subject: 

Tim,

Let it sit for awhile before you do anything. I've experienced the same problem at first with most of the ones I've put on. The bubbles on mine have always gone away after a week or two. The adhesive outgasses and the bubbles disappear. At least that's been my experience with stuff I've gotten from LMI.

Author:  Tim McKnight [ Wed Jun 08, 2005 6:49 am ]
Post subject: 

Thanks for the tips guys. The guard has been on for two weeks and it still has a few tiny bubbles under it. I will take it off and try again. When I put it on I left the backing on and just worked it down a bit at a time. Looks like I will have to go a LOT slower. I still seem to remember someone applying them wet but I can't remember what the liquid was

Author:  Pwoolson [ Wed Jun 08, 2005 7:52 am ]
Post subject: 

Tim, I think I've read that soapy water is used. Like the murphy's solution used to wet sand. spritz the top, apply the guard and burnish the heck out of it. then the water will slowly gas out.
I've never tried this myself because so far I've had good luck doing them dry.

Author:  HankMauel [ Wed Jun 08, 2005 12:37 pm ]
Post subject: 

From advice I passed out a few years back on another luthier forum:

Just some notes of advice... Practice cutting out a template first.
When satisfied, use it to guide your cutting of the plastic. Cut out
with real sharp hair scissors to avoid a funky edge that won't want to
lie flat. Have a scrupulously clean area...guitar top, your hands, no
wind currents, etc. You'll be amazed what a little spec can do under
that plastic. Once cut to shape, position it as you want it. With
masking tape, (2 pieces is usually enough) tape it down to the top near
the waist area so as to make a "hinge". Having removed the strings
before all this, fold the guard back (on the "hinge") so that the white
backing paper is now facing up. With sharp finger nails, start to
separate the lower edge( by the hinge) of the backing paper from the
clear plastic. DON'T TOUCH THE GLUE SURFACE WITH YOUR FINGERS. It will
pick up your fingerprint and they will show up once it is laid in
position. Now, carefully lift the backing paper from the guard as you
press up from the outside (face side) of the plastic. As you peel the
backing with one hand, gently press the face side down onto the guitar
top, working up toward the sound hole avoiding bubbles. The masking
tape hinge holds the plastic in place as you work up and is removed when
plastic is finally in place. When it is all down, rub over it with a
soft towel to help it stay down. It may look a little hazy at first,
but after a day or two, it will conform to any of the minute
irregularities on the top surface and practically disappear.

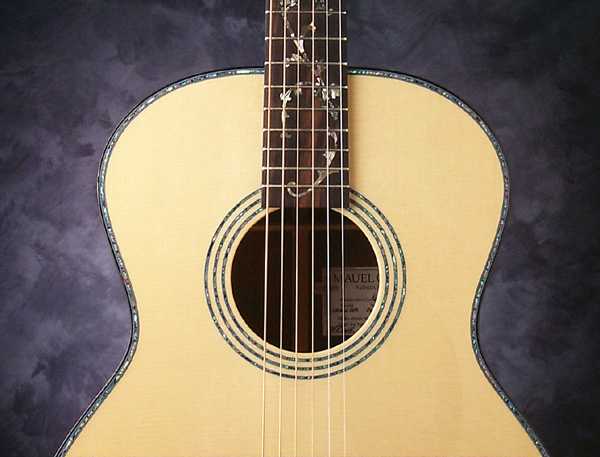
Here is an example where you can barely see the clear pickguard.

Author:  Rick Davis [ Wed Jun 08, 2005 1:14 pm ]
Post subject: 

Tim.

Hank's answer is probably the best, but I (and many others) have used a
drop of water with a tiny amount of soap to help the process. A few
ounces of water in a cup, one drop of soap, mix, then dip a fingertip in
the mix and spread out on the pickguard area. Squeegee it with whatever
you have handy (auto body fill spreaders work great), and you're done.
The soap just reduces surface tension so you can spread a little water
over a relatively large area.

With some pickguard material, a razor blade can be used as a scraper to
bevel the edge before installing. Makes a good job a little better.

Page 1 of 1 All times are UTC - 5 hours
Powered by phpBB® Forum Software © phpBB Group
http://www.phpbb.com/